2 posts tagged with "MySQL"

MySQL tag description

View All Tags

MySQL Node Issues

· 4 min read
Sofia Moura
Full Stack Developer

Sometimes we encounter problems with MySQL version and the mysql package for Node.js. To address this issue, we need to touch both Node.js projects and MySQL versions.


The Problem

Some of you are using the CodeOp projects/activities as guidance. Currently, those projects use the mysql package, which does not support caching_sha2_password, the default authentication plugin for MySQL 8.0 and above.

Additionally, MySQL 9 (the current default version) does not include the mysql_native_password security plugin. This mismatch is causing errors during migrations and database interactions.


The Solution

1. Migrate to the mysql2 Package

  • mysql2 is fully compatible with caching_sha2_password and offers better performance.
  • Only one person needs to make the necessary changes. The rest of the team can simply pull the updated code after it’s committed.

2. Keep MySQL Updated

  • MySQL 9 uses caching_sha2_password for stronger encryption and better security.
  • Downgrading to older plugins like mysql_native_password would weaken security and is not recommended.

🍏 Steps to Update MySQL for Mac Users Using Homebrew

  1. Check Your Current Version
    Run the following in the terminal:
    mysql --version

  2. If it’s not version 9+, stop the MySQL service:
    brew services stop mysql

  3. Ensure Homebrew is up to date:
    brew update

  4. Upgrade MySQL:
    brew upgrade mysql

  5. Confirm the upgrade:
    mysql --version

  6. Start the service:
    brew services start mysql

  7. Test if MySQL is running:
    mysql -u root -p


🤖 Steps for Windows Users

  1. Uninstall MySQL 8 (if necessary)

    • Stop the MySQL Service:
      Open the Services app (search “Services” in the Windows search bar).
      Find MySQL, right-click, and select Stop.

    • Uninstall MySQL:
      Go to Control Panel > Programs > Programs and Features.
      Locate MySQL Server, right-click, and choose Uninstall.

    • Remove Residual Data (Optional):
      Navigate to the MySQL data directory, usually located at:
      C:\ProgramData\MySQL

  2. Install MySQL 9

    • Download MySQL Installer:
      Go to MySQL Community Downloads.

    • Run the Installer:
      Choose the Custom Install option.
      Select MySQL Server 9.x (ensure it’s compatible with your architecture: x64 or x86).
      Proceed with the installation.

    • During Configuration:
      Set the authentication plugin to caching_sha2_password.

  3. Start MySQL:
    Use the MySQL Workbench or run the following command in the Command Prompt:
    net start mysql

  4. Test if MySQL is running:
    mysql -u root -p

⚠️ NEXT STEPS FOR ALL USERS

  1. Open the MySQL command line:
    Run the following command:
    mysql -u root -p

  2. Update the authentication plugin for the root user:
    Run the following query:

    ALTER USER 'root'@'localhost' IDENTIFIED WITH caching_sha2_password BY 'YOUR_PASSWORD';```

After updating the MySQL version, update the package and some code in your Node/Express project. This step needs to be performed by one person, and the others can pull the updated code once it's committed.

  1. On the server terminal of your project:

Remove the MySQL package:

npm uninstall mysql

Install the correct package: npm install mysql2

  1. Replace MySQL import statements in your project files: In your code, replace: const mysql = require("mysql");

With: const mysql = require("mysql2");

Make this change in the files:

helper.js database.js

5.Update the helper.js file: Remove the if/else if statements after the con.query block (approximately lines 36 to 55):

    if (result.affectedRows === 0) {
results.error = "Action not complete";
console.log(err);
reject(err);
con.end();
return;
}
// Removed this line because it returns an array in an array when empty set
// results.data.push(result);
} else if (result[0].constructor.name == "RowDataPacket") {
// Push each row (RowDataPacket) to data
result.forEach(row => results.data.push(row));
} else if (result[0].constructor.name == "OkPacket") {
// Push the first item in result list to data
results.data.push(result[0]);
}

Before the con.end() statement, add the following line:

results.data = result;

With these updates, the rest of the code and the response structure will remain the same, so no further updates are required.

Data flow in a React application

· 4 min read
Sophie Ogden
Software Engineer @ EuFMD

Understanding Data Flow in a React Application with MySQL and an API

Introduction

Building modern web applications often involves fetching data from a backend server and displaying it on the frontend. In this post, we'll explore how data flows from a MySQL database to a React frontend through an API layer. Whether you're new to data flow or looking to reinforce your understanding, this guide will break down each step in a simple and clear manner.

What We'll Cover

  1. MySQL Database
  2. API Layer
  3. React Frontend
  4. Putting It All Together

MySQL Database

MySQL is a popular relational database management system (RDBMS) that stores data in tables. Each table has rows and columns, where rows represent individual records and columns represent the attributes of those records.

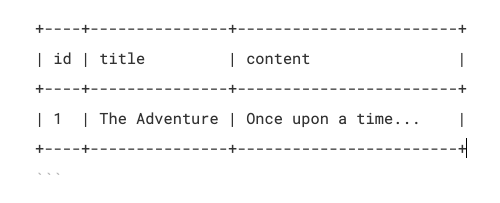
Example: stories Table

example MySQL table

In this table, we have three columns: id, title, and content. Each row represents a story.

API Layer

The API (Application Programming Interface) acts as an intermediary between the frontend and the database. It defines a set of endpoints that the frontend can call to perform CRUD (Create, Read, Update, Delete) operations.

Example API Endpoint

  • GET /api/stories/:id: Fetches a story by its ID.

Node.js/Express API Code

const express = require('express');
const mysql = require('mysql');
const app = express();
const connection = mysql.createConnection({
host: 'localhost',
user: 'root',
password: 'password',
database: 'stories_db'
});

app.get('/api/stories/:id', (req, res) => {
const storyId = req.params.id;
const query = 'SELECT * FROM stories WHERE id = ?';
connection.query(query, [storyId], (error, results) => {
if (error) {
return res.status(500).json({ error: 'Database error' });
}
if (results.length > 0) {
res.json(results[0]);
} else {
res.status(404).json({ error: 'Story not found' });
}
});
});

app.listen(3000, () => {
console.log('Server is running on port 3000');
});

React Frontend

React is a JavaScript library for building user interfaces. React components manage their own state and can fetch data from APIs to update the UI dynamically.

React Component Code

import React, { useState } from 'react';

function Story() {
const [story, setStory] = useState(null);

const fetchStory = async (id) => {
try {
const response = await fetch(`/api/stories/${id}`);
const data = await response.json();
setStory(data);
} catch (error) {
console.error('Error fetching story:', error);
}
};

return (
<div>
<button onClick={() => fetchStory(1)}>Fetch Story</button>
{story && (
<div>
<h1>{story.title}</h1>
<p>{story.content}</p>
</div>
)}
</div>
);
}

export default Story;

Putting It All Together

Let's walk through the complete process of fetching and displaying data in a React application.

Step 1: User Action (React Component)

A user clicks a button in the React component to fetch a story.

Step 2: API Request (Frontend to API)

The React component makes an HTTP GET request to the API endpoint to fetch the story data.

const fetchStory = async (id) => {
try {
const response = await fetch(`/api/stories/${id}`);
const data = await response.json();
setStory(data);
} catch (error) {
console.error('Error fetching story:', error);
}
};

Step 3: Database Query (API)

The API receives the request, processes it, and sends a SQL query to the MySQL database to retrieve the story data

SELECT * FROM stories WHERE id = 1;

Step 4: Data Retrieval (Database to API)

The MySQL database executes the SQL query, retrieves the data, and sends it back to the API.

Step 5: Response to Frontend (API to Frontend)

The API formats the retrieved data as JSON and sends it back to the React component.

{
"id": 1,
"title": "The Adventure",
"content": "Once upon a time..."
}

Step 6: Rendering (React Component)

The React component receives the data and updates its state, which triggers a re-render to display the story.

{story && (
<div>
<h1>{story.title}</h1>
<p>{story.content}</p>
</div>
)}

Conclusion

By understanding how data flows from a MySQL database to a React frontend through an API layer, you can build more dynamic and responsive web applications. This process ensures that users can interact with data seamlessly, making for a better user experience.

Happy coding!