2 posts tagged with "Data"

Data tag description

View All Tags

Pinia for State Management

Β· 3 min read
Zoe Laventhol
Full Stack Collaborator @ EuFMD

Using Pinia for state management in Vue apps​

🍍 What is Pinia?​

Pinia allows you to store data and methods (aka variables and functions) in a central way, and import them to different components throughout your app. This can simplify your code by importing and using variables and functions only in the components where they are needed. This avoids prop drilling and several layers of callback functions!

Here is the documentation. πŸ“–

When to use it?​

βœ…Β Use Pinia to store any data and methods that need to be accessible across multiple components. Ex:

  • myData needs to be set in Component.vue, but displayed in SiblingComponent.vue
  • Component.vue needs to fetch data based on some action in that component, but SiblingComponent.vue needs to display, edit or remove the same data.
  • myData and otherData are rendered in different components, but are both used in a third component to calculate some outcome.

❌ Do not use Pinia for data that is only used temporarily, or in a single component. Ex:

  • Component.vue temporarily sets a selectedItem - some function is performed on the selected item, then it clears when a new item is selected.
  • Component.vue uses specificData that never needs to be passed to or used in other components.

How to use it?​

Create a store πŸ—οΈβ€‹

First, create your store file and name it with this pattern: useExampleStore.js

  • i.e. use + YourStoreName + Store
  • so for example, for RMT's disease status data: useDiseaseStatusStore.js

Step-by-step instructions in comments below. You can look at examples in the codebase in client > src > stores.

// ******* STEP 1: import defineStore at the top *******
import { defineStore } from "pinia";

// ******* STEP 2: export your store, and after defineStore, give your store a unique descriptive name *******
export const useExampleStore = defineStore("example", {
// ******* STEP 3: define your data/variables in state *******
state: () => ({
myVariable: [],
anotherVariable: "I ❀️ Pinia",
}),

// ******* STEP 4: define your functions/methods in "actions" *******
actions: {
async myFunction(params) {
// your code...
},
anotherFunction() {
// your code...
},
},
});

// ******* THAT'S IT! Congrats :) *******

Use a store πŸ§€β€‹

Here’s a 🎬 how-to video

Process to use stored data or methods in any component is:

  1. In <script>, import:
    1. the correct store
    2. mapState if you’re using data/variables
    3. mapActions if you’re using functions/methods
import { useExampleStore } from "@/stores/useExampleStore";
import { mapState, mapActions } from "pinia";
  1. For data/variables, add a computed property in your <script>, and use mapState to destructure your stored data:
computed: {
...mapState(useExampleStore, ['myVariable', 'anotherVariable'])
},
  1. For functions/methods, use mapActions in your methods to destructure the stored functions. You do not need to include params, just function names:
methods: {
...mapActions(useExampleStore, ['myFunction', 'anotherFunction'])
},
  1. Then you can use as usual! i.e. Use the variables in your <template>, call the functions, etc., with the same syntax as if they were standard data or methods.
<div>
<select @change="myFunction(value)">
<option v-for="item in myVariable" :key="item.id" :value="item.name">
{{ item.name }}
</option>
</select>
</div>

Data flow in a React application

Β· 4 min read
Sophie Ogden
Software Engineer @ EuFMD

Understanding Data Flow in a React Application with MySQL and an API​

Introduction​

Building modern web applications often involves fetching data from a backend server and displaying it on the frontend. In this post, we'll explore how data flows from a MySQL database to a React frontend through an API layer. Whether you're new to data flow or looking to reinforce your understanding, this guide will break down each step in a simple and clear manner.

What We'll Cover​

  1. MySQL Database
  2. API Layer
  3. React Frontend
  4. Putting It All Together

MySQL Database​

MySQL is a popular relational database management system (RDBMS) that stores data in tables. Each table has rows and columns, where rows represent individual records and columns represent the attributes of those records.

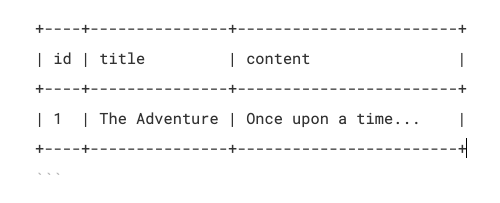
Example: stories Table

example MySQL table

In this table, we have three columns: id, title, and content. Each row represents a story.

API Layer​

The API (Application Programming Interface) acts as an intermediary between the frontend and the database. It defines a set of endpoints that the frontend can call to perform CRUD (Create, Read, Update, Delete) operations.

Example API Endpoint

  • GET /api/stories/:id: Fetches a story by its ID.

Node.js/Express API Code

const express = require('express');
const mysql = require('mysql');
const app = express();
const connection = mysql.createConnection({
host: 'localhost',
user: 'root',
password: 'password',
database: 'stories_db'
});

app.get('/api/stories/:id', (req, res) => {
const storyId = req.params.id;
const query = 'SELECT * FROM stories WHERE id = ?';
connection.query(query, [storyId], (error, results) => {
if (error) {
return res.status(500).json({ error: 'Database error' });
}
if (results.length > 0) {
res.json(results[0]);
} else {
res.status(404).json({ error: 'Story not found' });
}
});
});

app.listen(3000, () => {
console.log('Server is running on port 3000');
});

React Frontend​

React is a JavaScript library for building user interfaces. React components manage their own state and can fetch data from APIs to update the UI dynamically.

React Component Code

import React, { useState } from 'react';

function Story() {
const [story, setStory] = useState(null);

const fetchStory = async (id) => {
try {
const response = await fetch(`/api/stories/${id}`);
const data = await response.json();
setStory(data);
} catch (error) {
console.error('Error fetching story:', error);
}
};

return (
<div>
<button onClick={() => fetchStory(1)}>Fetch Story</button>
{story && (
<div>
<h1>{story.title}</h1>
<p>{story.content}</p>
</div>
)}
</div>
);
}

export default Story;

Putting It All Together​

Let's walk through the complete process of fetching and displaying data in a React application.

Step 1: User Action (React Component)​

A user clicks a button in the React component to fetch a story.

Step 2: API Request (Frontend to API)​

The React component makes an HTTP GET request to the API endpoint to fetch the story data.

const fetchStory = async (id) => {
try {
const response = await fetch(`/api/stories/${id}`);
const data = await response.json();
setStory(data);
} catch (error) {
console.error('Error fetching story:', error);
}
};

Step 3: Database Query (API)​

The API receives the request, processes it, and sends a SQL query to the MySQL database to retrieve the story data

SELECT * FROM stories WHERE id = 1;

Step 4: Data Retrieval (Database to API)​

The MySQL database executes the SQL query, retrieves the data, and sends it back to the API.

Step 5: Response to Frontend (API to Frontend)​

The API formats the retrieved data as JSON and sends it back to the React component.

{
"id": 1,
"title": "The Adventure",
"content": "Once upon a time..."
}

Step 6: Rendering (React Component)​

The React component receives the data and updates its state, which triggers a re-render to display the story.

{story && (
<div>
<h1>{story.title}</h1>
<p>{story.content}</p>
</div>
)}

Conclusion​

By understanding how data flows from a MySQL database to a React frontend through an API layer, you can build more dynamic and responsive web applications. This process ensures that users can interact with data seamlessly, making for a better user experience.

Happy coding!